
Meat searing methods for maximum juiciness and flavor.
Mastering the meat searing methods It's the dividing line between someone who just fries a steak and someone who truly understands the architecture of a memorable dish.
Adverts
It's a process that requires presence: the sizzle sound in the hot pan says much more about the doneness of the meat than any generic stopwatch could dictate.
In this guide, we demystify the science of the Maillard reaction, moving away from common misconceptions to focus on what truly retains liquids and builds layers of flavor.
It's not just about technique, but about understanding how fire control dictates the aromatic complexity that defines modern haute cuisine.
Below, we've put together a practical roadmap to help you navigate the kitchen smoothly and without guesswork, while still respecting the technical rigor demanded by the most discerning palates in 2026.
Adverts
Summary
- The Alchemy of the Maillard Reaction
- The Weight of Iron: Choosing the Equipment
- Anatomy of the Perfect Seal
- Time and Temperature Parameters
- Where most cooks fail
- FAQ: What nobody tells you
How does the Maillard reaction define meat searing methods?
The essence of a well-prepared meat lies in the chemistry, specifically in the interplay between amino acids and sugars when the meat reaches critical temperatures.
There's a common misconception here: many believe that sealing "closes the pores" to trap the juice, which is a persistent myth.
In fact, the meat searing methods They serve to create a crust of new chemical compounds that simply do not exist in the raw protein.
When the surface reaches about 140°C, a profound transformation occurs. If the meat is moist, this energy will be spent evaporating the water, and you will end up with a steamed, gray, and lifeless steak.
Therefore, pre-drying the garment with paper towels is the overlooked detail that separates amateurs from professionals.
This caramelized crust brings notes that flirt with toast and almond, instinctively elevating the sensory profile.
Does the right equipment do the hard work for you?
There's no way around it: to apply the meat searing methods With mastery, your frying pan needs to have "body." Cast iron and carbon steel reign supreme because they possess thermal inertia.
This means that when that cold piece touches the metal, the temperature doesn't plummet.
Pans with a thin non-stick coating are the enemy of a perfect crust. They not only fail to retain the necessary heat, but can also degrade at extreme temperatures, compromising the purity of the flavor.
A pan bottom — the famous background It only forms where there is a genuine and intense exchange of heat between the food and the metal.
In 2026, the digital insertion thermometer became the best friend of the conscious cook. It eliminates guesswork, allowing you to know exactly what's happening at the heart of the fiber, without having to cut into the meat and waste precious juices in the process.
Direct Sealing or Reverse Sear: Which is your battleground?
Direct searing is the classic visceral method: high heat, loud noise, and quick finish. It works brilliantly for thinner cuts, where the heat reaches the center quickly.
But there is something elegant about Reverse Sea (reverse sealing) which has won over professional kitchens for thicker pieces.
By roasting the meat slowly at a low temperature before searing, you ensure an even color throughout the interior.
The final searing is simply the master touch for the external texture. It's the solution to avoid that excessive gray edge that indicates meat that has been unevenly damaged by heat.
Master these meat searing methods It requires a rare virtue: controlling anxiety. Moving the meat before it naturally releases from the bottom of the pan is the quickest way to tear the fibers and ruin the dish's appearance. Let the heat do its work.
So that the meat searing methods As discussed earlier, to deliver the promised result, but the execution must be precise.
Below, I detail the technical step-by-step process for a prime cut of steak (such as chorizo or filet mignon) with a thickness of approximately 3 cm.
Technical Preparation: The Perfect Seal
1. Tempering and the Thermal Factor
Remove the meat from refrigeration at least 30 minutes before cooking. This thermal balance is vital; a cold piece lowers the temperature of the pan and prevents the immediate Maillard reaction.
- Golden tip: Use paper towels to dry the entire surface of the meat. Moisture is the biggest enemy of a crispy crust.
2. The Strategic Seasoning
Generously salt both sides with granulated salt or fleur de sel moments before cooking.
Salt helps create a dehydrated interface that speeds up browning. Avoid black pepper at this stage, as it can burn and become bitter under the intense heat of searing.
3. Heating the Metal
Heat a heavy-bottomed skillet (cast iron or steel) until it begins to emit a light white smoke.
Add a tablespoon of high smoke point oil (such as avocado oil or lard). The fat should shimmer and coat the bottom of the pan easily.
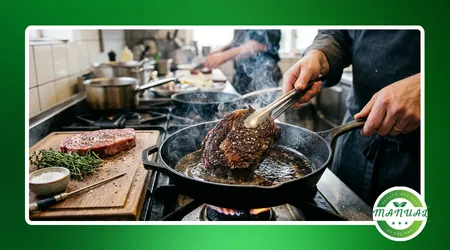
4. The Sealing (The Critical Hiss)
Place the meat in the pan with a motion away from you, avoiding splattering.
- Do not touch the item: Let it sear for about 3 minutes. The meat will "let you know" when it's ready to flip as it naturally releases from the bottom of the pan.
- Flip the piece over and sear the other side for another 2 to 3 minutes.
5. The Flavor Bath (Arroser)
Reduce the heat slightly. Add two tablespoons of unsalted butter, two crushed garlic cloves, and a sprig of thyme.
As soon as the butter foams, tilt the pan and, using a spoon, baste the meat continuously for 1 minute. This adds shine and an unparalleled aromatic depth.
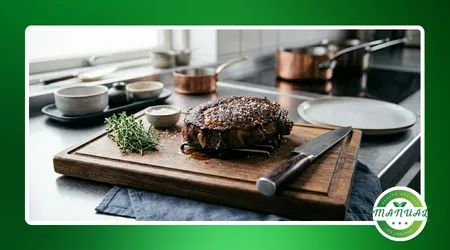
6. Mandatory Rest
Remove the meat from the pan and place it on a warmed rack or plate. Wait 5 to 8 minutes before making the first cut.
This time frame ensures that the juice remains inside the fiber and doesn't run down the cutting board, preserving the buttery texture of the protein.
Summary of Internal Points (Quick Guide)
To ensure accuracy, use a digital thermometer in the center of the piece:
- Seared/Rare: 50°C to 52°C
- To the Point of Evil: 54°C to 56°C
- To the Point: 58°C to 60°C
- Well Done: Above 68°C
The ritual of butter and the awakening of aromas.
O arroserBasting, the French technique of cooking meat, is almost a poetic act in the kitchen. Adding a generous spoonful of butter, crushed garlic cloves, and sprigs of thyme at the last minute creates an emulsion that envelops the meat, bringing a satin sheen and a complexity that oil alone could never deliver.
The secret here is timing. If you add the butter too early, the dairy solids burn and leave a bitter aftertaste.
The garlic and herbs should simply "sweat" in the hot fat, releasing essential oils that perfume the meat without masking its primary flavor.
++ How to blanch vegetables without losing color and nutrients during cooking.
Technical Reference Guide (Scenario 2026)
This table serves as a guide for those seeking consistency. Remember that each piece is unique, but these parameters guarantee a safe and technical starting point.
++ Professional flambéing tips that don't work in the home kitchen.
| Meat Cut | Surface Heat | Suggested Time | Internal Target (Point) |
| Filet Mignon Medallion | 210°C+ | 3 minutes per side | 52°C (Rare) |
| Ribeye | 200°C | 4 minutes per side | 55°C (At the point) |
| Picanha (Fat Side) | 170°C (Render) | Until golden brown. | 54°C (At the point) |
| Thigh and Drumstick | 190°C | 8 min (bass skin) | 74°C (Cooked) |
Rest: the necessary silence before the first cut.
The most painful mistake after applying good meat searing methods It happens off the heat. Cutting the piece as soon as it comes out of the pan is a waste of technique.
The fibers are contracted by the aggressive heat; they need time to relax and reabsorb the fluids that have been pushed to the center.
Five minutes of resting on a warm rack or plate transforms the texture of the meat. If you don't let the protein rest, the dish becomes flooded with blood and the fibers become tough.
This is the moment when physics works in favor of gastronomy, allowing the succulence to stabilize in a homogeneous way.
++ Basic Baking Utensils Guide
Where theory meets error: real-world practice.
Often, the problem starts with the meat's temperature even before it touches the pan. Proteins that go straight from ice to the heat suffer a shock that hardens the fibers and prevents the center from heating properly.
Seasoning is also crucial: too little salt prevents the surface dehydration necessary for a crispy crust.
Another common vice is the fear of fire. Searing requires courage to maintain a high temperature. If you notice the meat releasing water and "boiling," remove it immediately, reheat the pan, and start again.
Cooking is, above all, an exercise in real-time course correction.
Understand the meat searing methods It's about embracing technique so that intuition can shine.
When you stop fighting the fire and start using it as a tool for transformation, the result on the plate is simply the natural consequence of a respectful and precise process.
To delve deeper into the scientific basis for the safety of this process and the ideal thermal limits, consult the technical standards of [relevant authority/organization]. Health Portal.
FAQ – What you need to know
1. Can I use any oil for sealing?
No. Oils with a low smoke point, such as extra virgin olive oil or regular butter, burn quickly and leave a smoky taste. Use refined oils or animal fat (lard/tallow) for the initial sealing.
2. Should the meat be at room temperature?
Yes, ideally. Leaving it out of the refrigerator for 30 minutes balances the internal temperature, ensuring that the heat from searing doesn't encounter a frozen core that would prevent it from reaching the perfect point.
3. Should I sear the sides of the steak?
Whenever possible. Searing the sides helps render out the external fat and contributes to the professional look of the dish, as well as adding more area for the Maillard reaction.
4. Why did my meat stick to the pan?
Probably because you tried to flip it too early or the pan wasn't hot enough. The meat naturally releases from the metal once the crust (Maillard reaction) has properly formed.